


Last updated: October 29, 2026 · Reading time: 15–20 minutes
Install n8n, connect it to Icinga, and start seeing your first alerts in Microsoft Teams: You can do all this on Ubuntu 26.04 in just one afternoon. After that, your monitoring system will immediately report every status change in the Teams channel, send a status report on weekdays, and warn you in advance about expiring certificates.
The key points in 30 seconds
- n8n runs via Docker Compose in three containers: n8n, PostgreSQL 17, and a task runner for code nodes. n8n no longer supports MySQL and MariaDB as of version 2.0.
- n8n reads hosts and services via the Icinga REST API using its own API user, which is authorized to acknowledge issues and set downtime but cannot change any configuration.
- Whenever there’s a status change, Icinga calls a script that triggers a secure n8n webhook. n8n posts the message to your channel via the Teams app’s “Workflows” feature.
- In addition, you’ll receive a daily status report on weekdays and a weekly certificate report.
- Before going live, we still need to set up HTTPS via a reverse proxy and copy the backups to a second system.
What is n8n?
n8n is a workflow automation platform. You build workflows in your browser using building blocks called “nodes,” such as “Receive Webhook,” “Send HTTP Request,” or “Execute Code.” n8n can be self-hosted, so data such as hostnames and alert texts never leave your network.
Installation Requirements
- A server running Ubuntu 26.04 with root or sudo privileges
- A running Icinga 2 instance, located on the same server as described in this guide
- A Microsoft Teams channel where you can create a webhook using the “Workflows” app
- In the commands, “IP address of your server on the LAN” and “Training” refer to its hostname; replace both with your own values.
Installing n8n: Step by Step
In the first four steps, you’ll set up Docker, create the configuration, and start n8n. To do this, use `sudo -i` to switch to a root shell.
Step 1: Install Docker
Install Docker and the Compose plugin from the official Docker repository:
Installiere Docker und das Compose-Plugin aus dem offiziellen Docker-Repository:

Bash
apt update && apt install -y ca-certificates curl jq
install -m 0755 -d /etc/apt/keyrings
curl -fsSL https://download.docker.com/linux/ubuntu/gpg -o /etc/apt/keyrings/docker.asc
chmod a+r /etc/apt/keyrings/docker.asc
echo "deb [arch=$(dpkg --print-architecture) signed-by=/etc/apt/keyrings/docker.asc] \
https://download.docker.com/linux/ubuntu $(. /etc/os-release && echo "$VERSION_CODENAME") stable" \
> /etc/apt/sources.list.d/docker.list
apt update && apt install -y docker-ce docker-ce-cli containerd.io docker-compose-pluginYou’ll need the jq tool later for the notification script in Icinga.
Step 2: Create the project directory and secrets
All files are located in /opt/n8n. Create the directory and copy the Icinga CA certificate directly into it so that n8n can properly verify the connection to the Icinga API later:
mkdir -p /opt/n8n/certs && cd /opt/n8n
cp /var/lib/icinga2/certs/ca.crt certs/icinga-ca.crt
chmod 644 certs/icinga-ca.crtNext, create the .env file with placeholders:
cat > .env << 'EOF'
N8N_VERSION=CHANGE_ME_VERSION
N8N_HOST=CHANGE_ME_IP
POSTGRES_USER=n8n
POSTGRES_DB=n8n
POSTGRES_PASSWORD=CHANGE_ME_DB
N8N_ENCRYPTION_KEY=CHANGE_ME_KEY
N8N_RUNNERS_AUTH_TOKEN=CHANGE_ME_TOKEN
EOF
chmod 600 .envYou don’t need to fill in the placeholders manually. Run the following commands exactly as they are: They generate a password, encryption key, and token using random values, enter your server’s IP address, and determine the current stable n8n version:
sed -i "s/CHANGE_ME_DB/$(openssl rand -hex 24)/" .env
sed -i "s/CHANGE_ME_KEY/$(openssl rand -hex 32)/" .env
sed -i "s/CHANGE_ME_TOKEN/$(openssl rand -hex 32)/" .env
sed -i "s/CHANGE_ME_IP/$(hostname -I | awk '{print $1}')/" .env
docker pull n8nio/n8n:stable
sed -i "s/CHANGE_ME_VERSION/$(docker run --rm n8nio/n8n:stable --version)/" .env
Use ` cat .env ` to check the result. The placeholders should now be replaced with actual values. If your server has multiple network cards, check `N8N_HOST` to see if the correct IP address has been entered, and correct it with a text editor if necessary.
Important: Copy the value of N8N_ENCRYPTION_KEY into your password manager. n8n uses this key to encrypt all stored login credentials. If it is lost, they will be unusable after a reinstallation.
Why a specific version? n8n and the Task Runner must be exactly the same version. Later, you can use the N8N_VERSION variable to update both containers with a single line of code.
Step 3: Create docker-compose.yml
The environment consists of three containers: n8n itself, PostgreSQL as the database, and the task runner, which executes code from code nodes in isolation. Create the file /opt/n8n/docker-compose.yml:
services:
  postgres:
    image: postgres:17
    container_name: n8n-postgres
    restart: unless-stopped
    environment:
      POSTGRES_USER: ${POSTGRES_USER}
      POSTGRES_PASSWORD: ${POSTGRES_PASSWORD}
      POSTGRES_DB: ${POSTGRES_DB}
    volumes:
      - postgres_data:/var/lib/postgresql/data
    healthcheck:
      test: ["CMD-SHELL", "pg_isready -h localhost -U ${POSTGRES_USER} -d ${POSTGRES_DB}"]
      interval: 5s
      timeout: 5s
      retries: 10

  n8n:
    image: n8nio/n8n:${N8N_VERSION}
    container_name: n8n
    restart: unless-stopped
    ports:
      - "5678:5678"
    extra_hosts:
      - "training:<server-ip>"
    environment:
      DB_TYPE: postgresdb
      DB_POSTGRESDB_HOST: postgres
      DB_POSTGRESDB_PORT: 5432
      DB_POSTGRESDB_DATABASE: ${POSTGRES_DB}
      DB_POSTGRESDB_USER: ${POSTGRES_USER}
      DB_POSTGRESDB_PASSWORD: ${POSTGRES_PASSWORD}
      N8N_ENCRYPTION_KEY: ${N8N_ENCRYPTION_KEY}
      N8N_HOST: ${N8N_HOST}
      N8N_PORT: 5678
      N8N_PROTOCOL: http
      WEBHOOK_URL: http://${N8N_HOST}:5678/
      N8N_SECURE_COOKIE: "false"
      GENERIC_TIMEZONE: Europe/Berlin
      TZ: Europe/Berlin
      N8N_RUNNERS_MODE: external
      N8N_RUNNERS_BROKER_LISTEN_ADDRESS: 0.0.0.0
      N8N_RUNNERS_AUTH_TOKEN: ${N8N_RUNNERS_AUTH_TOKEN}
      EXECUTIONS_DATA_PRUNE: "true"
      EXECUTIONS_DATA_MAX_AGE: 336
      N8N_DIAGNOSTICS_ENABLED: "false"
      NODE_EXTRA_CA_CERTS: /certs/icinga-ca.crt
    volumes:
      - n8n_data:/home/node/.n8n
      - ./certs:/certs:ro
    depends_on:
      postgres:
        condition: service_healthy

  task-runners:
    image: n8nio/runners:${N8N_VERSION}
    container_name: n8n-runners
    restart: unless-stopped
    environment:
      N8N_RUNNERS_TASK_BROKER_URI: http://n8n:5679
      N8N_RUNNERS_AUTH_TOKEN: ${N8N_RUNNERS_AUTH_TOKEN}
    depends_on:
      - n8n

volumes:
  postgres_data:
n8n_data:Here’s a quick overview of the most important settings:
- postgres:17 is the database. Since n8n 2.0, n8n has only supported PostgreSQL and SQLite; it no longer supports MySQL or MariaDB.
- N8N_RUNNERS_MODE: “external” allows code nodes to run task runners in their own containers. This is the recommended configuration in n8n 2.x.
- N8N_SECURE_COOKIE: “false” allows login via HTTP. This is intended only for operation on an internal network until HTTPS is set up.
- `extra_hosts` and `NODE_EXTRA_CA_CERTS` ensure that n8n can reach Icinga using its hostname and trusts its certificate. The hostname must match the name in the Icinga certificate, which you can view by running `openssl x509 -in /var/lib/icinga2/certs/$(hostname).crt -noout -subject`.
- EXECUTIONS_DATA_PRUNE deletes execution data after 336 hours, or 14 days.
Step 4: Start n8n
Check the file and start the containers:
docker compose config --quiet && docker compose up -d
docker compose psAll three containers should have the status ” running.” Then go to http://deine-IP-Addresse:5678 in your browser and create your owner account. You can close the AI assistant dialog that appears afterward; n8n works without it.
To test whether the Task Runner is working, create a new workflow: Add a code node with
return [{ json: { test: “ok” } }];
and run it. If “ok” appears in the output, the installation is complete.
Connecting to Icinga
n8n retrieves hosts and services via Icinga’s REST API on port 5665. For this purpose, n8n is assigned its own API user.
Step 5: Create an API user for n8n
First, check whether the API is active. The output should show “api” listed under “Enabled”:
icinga2 feature listIf not, enable it with `icinga2 api setup` and then restart Icinga with `systemctl restart icinga2`.
Next, create a password and set up the user. Make a note of the password; you’ll need it in Step 6:
PW=$(openssl rand -hex 20) && echo "$PW"cat >> /etc/icinga2/conf.d/api-users.conf << EOF
object ApiUser "n8n" {
password = "$PW"
permissions = [
"status/query",
"objects/query/Host",
"objects/query/Service",
"actions/acknowledge-problem",
"actions/remove-acknowledgement",
"actions/schedule-downtime",
"actions/remove-downtime"
]
}
EOFThe user can view hosts and services, confirm issues, and set downtime, but cannot change the configuration. Check the configuration and restart Icinga:
icinga2 daemon -C && systemctl reload icinga2With the next call, you’ll test the connection, including certificate verification. If JSON is returned, everything is ready:
curl -s --cacert /var/lib/icinga2/certs/ca.crt -u "n8n:$PW" https://training:5665/v1/status | head -c 300Step 6: Enter your login credentials in n8n
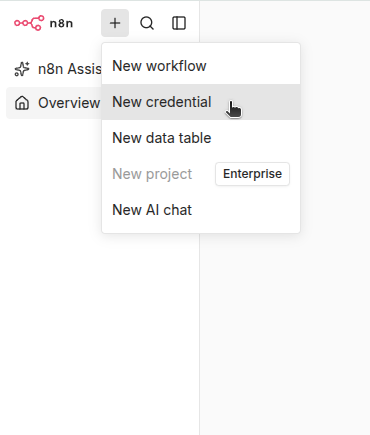
In n8n, open the Credentials section and create new credentials of the Basic Auth type. Enter “n8n ” as the username and the value from Step 5 as the password. Name the credential “Icinga API” and save it.
n8n encrypts the password using the encryption key. It never appears in plain text anywhere in the workflows.
Send Real-Time Alerts to Microsoft Teams
Every time the status changes, Icinga calls a script. The script sends the data to a webhook in n8n, and n8n posts a message to your Teams channel based on that data. This ensures that alerts arrive immediately, without duplicate messages, and that all clearances are also reported.
Step 7: Create a webhook in Microsoft Teams
In Teams, open the channel for alerts, click the three dots next to the channel name, and select Workflows. Search for the template “Send webhook notifications to a channel,” give it a name such as “n8n Icinga Alerts,” and confirm the team and channel. At the end, Teams will display a long URL—copy it.
Why Workflows? Microsoft is phasing out the classic incoming webhook connectors in Teams. The Workflows app is the way to go now. Treat the URL like a password—anyone who knows it can post in your channel.
Step 8: Set up an alarm workflow in n8n
First, generate a token to secure the webhook, and make a note of it:
openssl rand -hex 24Create a new “Icinga Alarms” workflow in n8n and add a webhook as the first node:
- HTTP Method: POST
- Path: icinga-alarm
- Authentication: Header Auth, with new credentials: Name X-Icinga-Token, Value your token
- Response: Immediate
Add an HTTP Request node. Set the Method to POST, enter the Teams URL from Step 7 as the URL, enable “Send Body,” and select JSON as the Body Content Type using “Using JSON”:
{
  "type": "message",
  "attachments": [{
    "contentType": "application/vnd.microsoft.card.adaptive",
    "content": {
      "$schema": "http://adaptivecards.io/schemas/adaptive-card.json",
      "type": "AdaptiveCard",
      "version": "1.4",
      "body": [
        {
          "type": "TextBlock",
          "size": "Large",
          "weight": "Bolder",
          "wrap": true,
          "color": "{{ ({CRITICAL: 'Attention', DOWN: 'Attention', WARNING: 'Warning', UNREACHABLE: 'Warning', OK: 'Good', UP: 'Good'})[$json.body.state] || 'Accent' }}",
          "text": "{{ $json.body.state }}: {{ $json.body.service ? $json.body.service + ' auf ' + $json.body.host : 'Host ' + $json.body.host }} < $json.body.type >"
        },
        {
          "type": "FactSet",
          "facts": [
            { "title": "Host", "value": "{{ $json.body.host }}" },
            { "title": "Service", "value": "{{ $json.body.service || 'Host-Alarm' }}" },
            { "title": "Ausgabe", "value": {{ JSON.stringify($json.body.output) }} },
            { "title": "Zeit", "value": "{{ $json.body.time }}" }
          ]
        }
      ]
    }
  }]
}The heading turns red for CRITICAL and DOWN, yellow for WARNING, and green for OK and UP. The validation output uses JSON.stringify because otherwise, quotation marks in the output would corrupt the JSON.
Save the workflow and activate it in the upper-right corner. From now on, the webhook will be permanently located under the
The production URL is available at http://deine-IP-Addresse:5678/webhook/icinga-alarm.
Step 9: Create a notification script in Icinga
The script uses jq to wrap the data from Icinga as JSON and sends it to n8n:
cat > /etc/icinga2/scripts/n8n-notify.sh << 'EOF'
#!/bin/bash
# Sendet Icinga-Benachrichtigungen an den n8n-Webhook
N8N_URL="http://deine-IP-Addresse:5678/webhook/icinga-alarm"
N8N_TOKEN="Dein_TOKEN"

payload=$(jq -n \
  --arg type "$N8N_TYPE" \
  --arg host "$N8N_HOST" \
  --arg service "$N8N_SERVICE" \
  --arg state "$N8N_STATE" \
  --arg output "$N8N_OUTPUT" \
  --arg time "$N8N_TIME" \
  '{type: $type, host: $host, service: $service, state: $state, output: $output, time: $time}')

curl -sS --fail -m 10 -X POST "$N8N_URL" \
  -H "Content-Type: application/json" \
  -H "X-Icinga-Token: $N8N_TOKEN" \
  -d "$payload"
EOFEnter your server’s IP address and your token, and restrict access, since the script contains the token:
Bash
sed -i "s/deine-IP-Addresse/$(hostname -I | awk '{print $1}')/" /etc/icinga2/scripts/n8n-notify.sh
sed -i 's/Dein_TOKEN/hier-dein-token/' /etc/icinga2/scripts/n8n-notify.sh
chown root:nagios /etc/icinga2/scripts/n8n-notify.sh
chmod 750 /etc/icinga2/scripts/n8n-notify.shTest the script exactly as Icinga will call it. If {“message”:”Workflow was started”} is returned, the test message will appear in Teams:
sudo -u nagios env N8N_TYPE=PROBLEM N8N_HOST=testhost N8N_SERVICE=test \
  N8N_STATE=CRITICAL N8N_OUTPUT="Testmeldung" N8N_TIME="$(date)" \
/etc/icinga2/scripts/n8n-notify.shStep 10: Create Notification Rules
Icinga now needs two commands (one for services and one for hosts), a user as the recipient, and two rules:
cat > /etc/icinga2/conf.d/n8n-notification.conf << 'EOF'
object NotificationCommand "n8n-webhook" {
  command = [ ConfigDir + "/scripts/n8n-notify.sh" ]
  env = {
    N8N_TYPE    = "$notification.type$"
    N8N_HOST    = "$host.name$"
    N8N_SERVICE = "$service.display_name$"
    N8N_STATE   = "$service.state$"
    N8N_OUTPUT  = "$service.output$"
    N8N_TIME    = "$icinga.long_date_time$"
  }
}

object NotificationCommand "n8n-webhook-host" {
  command = [ ConfigDir + "/scripts/n8n-notify.sh" ]
  env = {
    N8N_TYPE    = "$notification.type$"
    N8N_HOST    = "$host.name$"
    N8N_SERVICE = ""
    N8N_STATE   = "$host.state$"
    N8N_OUTPUT  = "$host.output$"
    N8N_TIME    = "$icinga.long_date_time$"
  }
}

object User "n8n-webhook" {
  display_name = "n8n Webhook"
}

apply Notification "n8n-service" to Service {
  command = "n8n-webhook"
  users = [ "n8n-webhook" ]
  interval = 0
  assign where true
  ignore where host.vars.n8n_alarm == false || service.vars.n8n_alarm == false
}

apply Notification "n8n-host" to Host {
  command = "n8n-webhook-host"
  users = [ "n8n-webhook" ]
  interval = 0
  assign where true
  ignore where host.vars.n8n_alarm == false
}
EOFGood to know:
- Setting `interval = 0` sends exactly one notification per issue instead of regular reminders.
- When `assign where` is set to `true`, it applies to all hosts and services, including future ones.
- `ignore where` excludes hosts or services for which you set `vars.n8n_alarm = false`
Next, check how Icinga integrates its configuration:
grep -n "conf.d" /etc/icinga2/icinga2.confIf `include_recursive “conf.d”` is enabled, the new file is loaded automatically. If the line is commented out—which is common in installations using Director and Icinga DB—you must manually include the file:
grep -q 'conf.d/n8n-notification.conf' /etc/icinga2/icinga2.conf || \
echo 'include "conf.d/n8n-notification.conf"' >> /etc/icinga2/icinga2.confCheck the configuration and restart Icinga:
icinga2 daemon -C && systemctl restart icinga2Step 11: Test the alert
A host with the “dummy” check, which returns a specified status, is suitable for testing:
cat > /etc/icinga2/conf.d/n8n-test.conf << 'EOF'
object Host "n8n-testhost" {
  check_command = "dummy"
  vars.dummy_state = 0
  vars.dummy_text = "Testhost erreichbar"
}

object Service "test-critical" {
  host_name = "n8n-testhost"
  check_command = "dummy"
  check_interval = 1m
  vars.dummy_state = 2
  vars.dummy_text = "Webserver antwortet nicht (simuliert)"
}
EOFgrep -q 'conf.d/n8n-test.conf' /etc/icinga2/icinga2.conf || \
echo 'include "conf.d/n8n-test.conf"' >> /etc/icinga2/icinga2.conficinga2 daemon -C && systemctl restart icinga2Icinga does not report a problem until it has been confirmed after several attempts.
After about three minutes, a red notification for “test-critical” appears in Teams. If you set `vars.dummy_state` to 0 and restart Icinga, a green “all clear” notification will follow shortly thereafter.
By the way, if a host goes down, Icinga suppresses the alerts from its services. This way, a server outage generates a single message instead of many. Once everything is working again, you can remove the test host:
sed -i '/conf.d\/n8n-test.conf/d' /etc/icinga2/icinga2.conf
rm /etc/icinga2/conf.d/n8n-test.conf
icinga2 daemon -C && systemctl restart icinga2Implement n8n with support?
Whether it’s integrating with your ticketing system, setting up custom alerts, or running in a cluster: Our consultants will help you seamlessly integrate n8n into your infrastructure.
Free initial consultation →
Scheduled Reports
In addition to real-time alerts, n8n sends two regular reports to the same Teams channel: an overview of all open issues on weekdays and an overview of expiring certificates on Mondays.
Step 12: Set Up a Daily Status Report
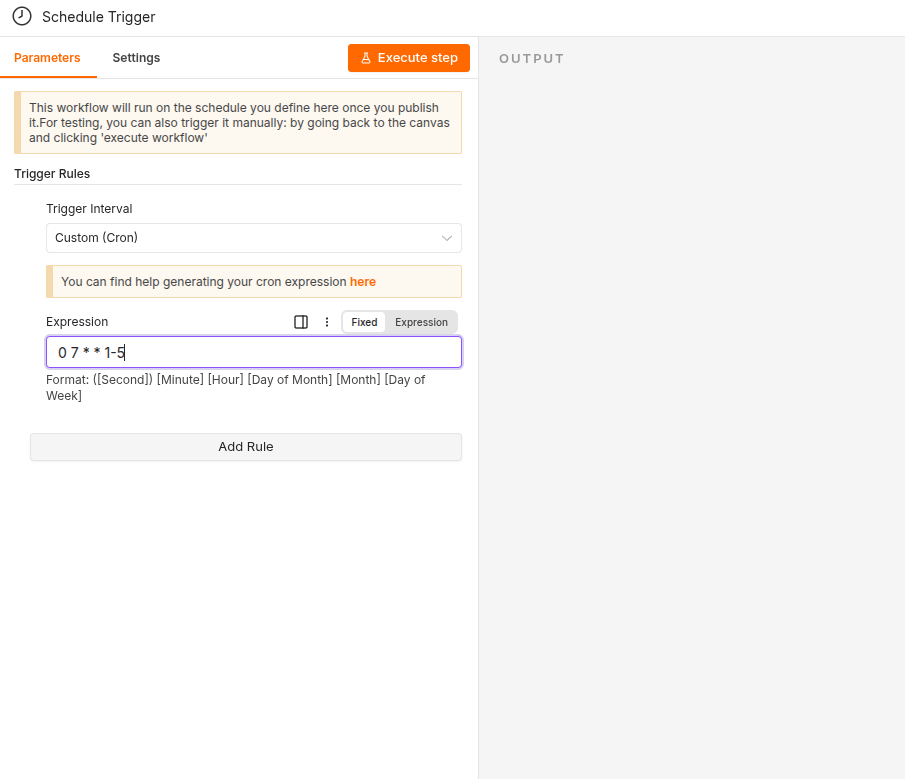
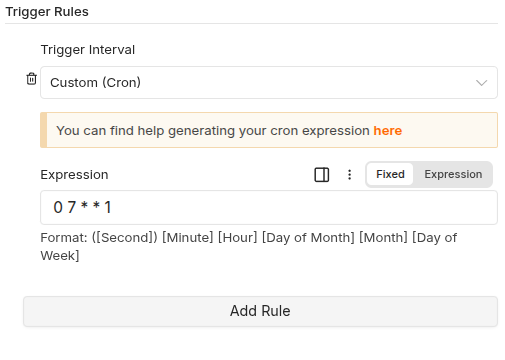
Create a new Icinga Status Report workflow. Use a Schedule Trigger with a Trigger Interval set to “Custom (Cron)” and this expression for Monday through Friday at 7:00 a.m.:
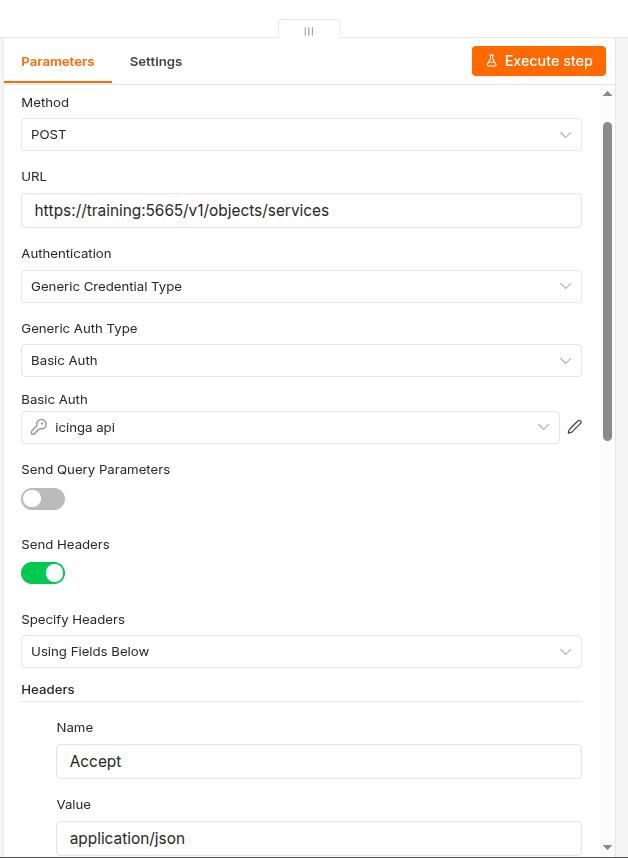
Add an HTTP Request node that queries Icinga:
- Method: POST
- URL: https://training:5665/v1/objects/services
- Authentication: Generic Credential Type, Basic Auth, Icinga API Credentials
- Send Headers: Accept with application/json and X-HTTP-Method-Override with GET
- Send Body: JSON, using JSON, with the following content:
{
"filter": "service.state != 0 && service.acknowledgement == 0",
"attrs": ["display_name", "host_name", "state", "last_check_result"]
}
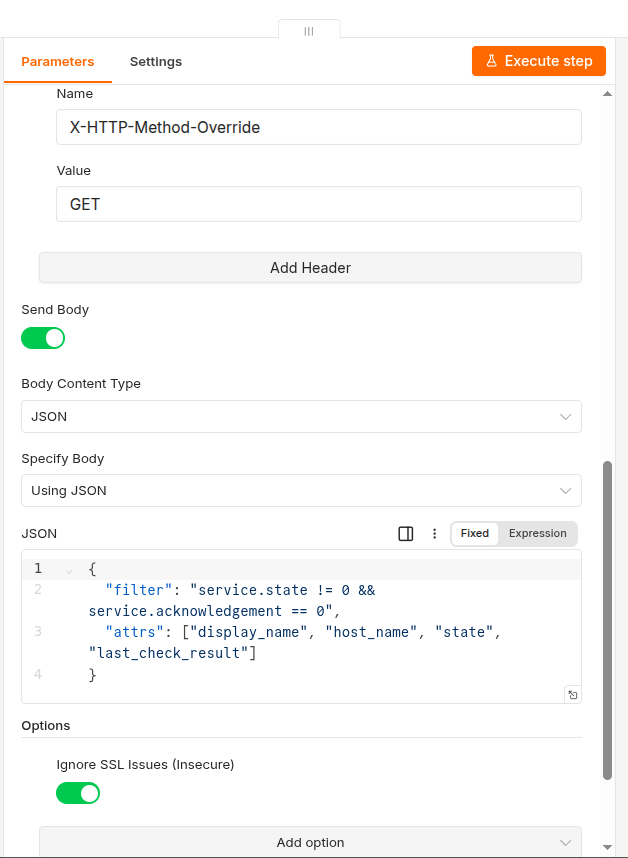
Why use POST with a GET header? Icinga expects filters for read requests, but a GET request cannot include a body. The X-HTTP-Method-Override: GET header is the method recommended by Icinga for passing filters correctly. The filter returns all issues that no one has yet confirmed in Icinga.
As the third node, add an HTTP Request node for Teams, configured as in Step 8, with this body:
{
  "type": "message",
  "attachments": [{
    "contentType": "application/vnd.microsoft.card.adaptive",
    "content": {
      "$schema": "http://adaptivecards.io/schemas/adaptive-card.json",
      "type": "AdaptiveCard",
      "version": "1.4",
      "body": [
        {
          "type": "TextBlock",
          "size": "Large",
          "weight": "Bolder",
          "text": "Icinga-Statusbericht vom {{ $now.toFormat('dd.MM.yyyy') }}"
        },
        {
          "type": "TextBlock",
          "wrap": true,
          "color": "{{ $json.results.length ? 'Warning' : 'Good' }}",
          "text": "{{ $json.results.length === 0 ? 'Alles in Ordnung, keine offenen Probleme.' : ($json.results.length === 1 ? 'Aktuell 1 offenes Problem:' : 'Aktuell ' + $json.results.length + ' offene Probleme:') }}"
        },
        {
          "type": "FactSet",
          "facts": {{ JSON.stringify($json.results.length === 0 ? [{ title: 'Status', value: 'Alle Services OK' }] : $json.results.sort((a, b) => b.attrs.state - a.attrs.state).map(r => ({ title: ['OK', 'WARNING', 'CRITICAL', 'UNKNOWN'][r.attrs.state], value: r.attrs.host_name + ' / ' + r.attrs.display_name + ': ' + (r.attrs.last_check_result?.output || '') }))) }}
        }
      ]
    }
  }]
}The message displays the current date, adjusts the sentence based on the number of issues, and sorts the list by severity, with CRITICAL coming before WARNING. If everything is green, it reports that as well. Save the workflow and activate it.
Tip: Also, keep a manual trigger connected to the Icinga node. That way, you can test the report at any time by clicking “Execute workflow.”
Step 13: Set Up the Weekly Certificate Report
Icinga handles the verification of the certificates. To do this, create a collection host with your domains. For each domain, an “Apply” rule automatically creates a separate service:
cat > /etc/icinga2/conf.d/zertifikate.conf << 'EOF'
object Host "zertifikate" {
  check_command = "dummy"
  vars.dummy_state = 0
  vars.dummy_text = "Sammel-Host für Zertifikatsprüfungen"
  vars.domains = [
    "www.netways.de",
    "www.n8n.io"
  ]
}

apply Service "cert-" for (domain in host.vars.domains) {
  check_command = "http"
  check_interval = 12h
  retry_interval = 30m
  vars.http_address = domain
  vars.http_vhost = domain
  vars.http_ssl = true
  vars.http_sni = true
  vars.http_certificate = "30,14"
}
EOF
grep -q 'conf.d/zertifikate.conf' /etc/icinga2/icinga2.conf || \
  echo 'include "conf.d/zertifikate.conf"' >> /etc/icinga2/icinga2.conf
icinga2 daemon -C && systemctl restart icinga2Icinga checks each certificate twice a day. When the remaining validity period is 30 days or less, the service turns yellow; when it’s 14 days or less, it turns red, and the rules from Step 10 automatically report this in Teams. You trigger the first check in Icinga Web by clicking “Check Now” for the respective cert–service.
For the report, duplicate the workflow from Step 12 in n8n and name the copy “Certificates Weekly Report.” Then adjust three things.
In the Schedule Trigger, change the expression to Monday at 7:00 a.m.:
Why does the code support multiple date formats? How the validation plugin displays the expiration date depends on its version and the system language. For example, on a server set to German, it will display “Fr 11 Dez 2026 20:02:07 GMT,” and on an English server, “Fri Dec 11.” Domains without a readable date are placed in the “Unverifiable” section to ensure that no issues are overlooked.
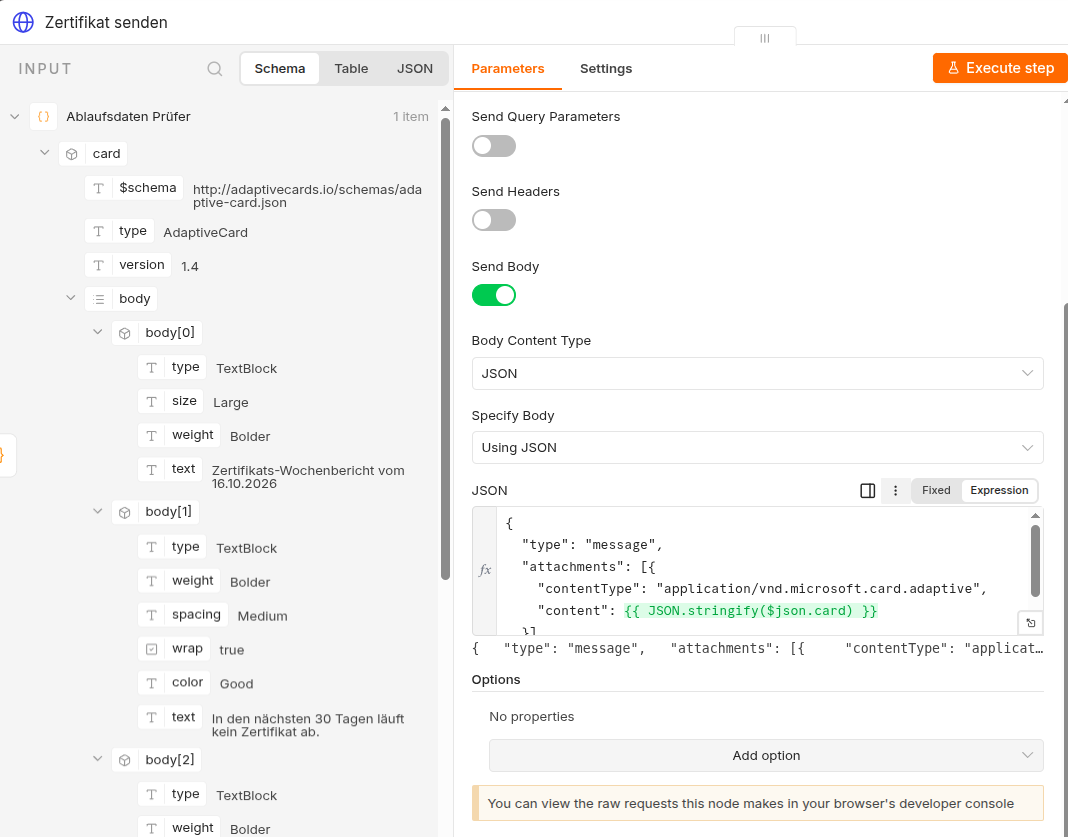
Finally, customize the Teams node. Open it and replace the entire contents of the JSON field with the following shortened version. The Code node has already built the message completely and passes it on to the card field. The Teams node just needs to wrap it in the format that Teams expects and send it:
{
  "type": "message",
  "attachments": [{
    "contentType": "application/vnd.microsoft.card.adaptive",
    "content": {{ JSON.stringify($json.card) }}
  }]
}
Ensure Business Continuity
Step 13: Set Up a Backup
Finally, back up everything needed for a restore every night: the n8n database, the .env file containing the encryption key, the Compose configuration including the certificate, and the Icinga configuration.
cat > /opt/n8n/backup.sh << 'EOF'
#!/bin/bash
# Tägliches Backup für n8n und Icinga-Konfiguration
set -e
BACKUP_DIR=/opt/n8n/backups
DATE=$(date +%F)
mkdir -p "$BACKUP_DIR"

docker exec n8n-postgres pg_dump -U n8n -d n8n | gzip > "$BACKUP_DIR/n8n-db-$DATE.sql.gz"
cp /opt/n8n/.env "$BACKUP_DIR/env-$DATE.bak"
tar czf "$BACKUP_DIR/n8n-config-$DATE.tar.gz" -C /opt/n8n docker-compose.yml certs
tar czf "$BACKUP_DIR/icinga2-config-$DATE.tar.gz" -C /etc icinga2

chmod 600 "$BACKUP_DIR"/*
find "$BACKUP_DIR" -type f -mtime +14 -delete
EOF
chmod 700 /opt/n8n/backup.shRun the script manually once, and then set up a cron job for any time you like:
/opt/n8n/backup.sh && ls -lh /opt/n8n/backups
echo '0 2 * * * root /opt/n8n/backup.sh' > /etc/cron.d/n8n-backupWhere is the time specified? In the first two fields of the cron entry: 0 represents the minute, 5 represents the hour. The three asterisks that follow represent every day, every month, and every day of the week. For 2:30 a.m., for example, the entry would be 30 2 * * *. Cron uses the server’s time zone, which you can check with `timedatectl`.
The script automatically deletes backups that are older than 14 days. For production use, you should also regularly copy the /opt/n8n/backups folder to another system.
Want to implement n8n with support? Whether it’s integrating it with your ticketing system, setting up custom alerts, or running it in a cluster: Our consultants will help you seamlessly integrate n8n into your infrastructure.
Conclusion on the n8n Installation
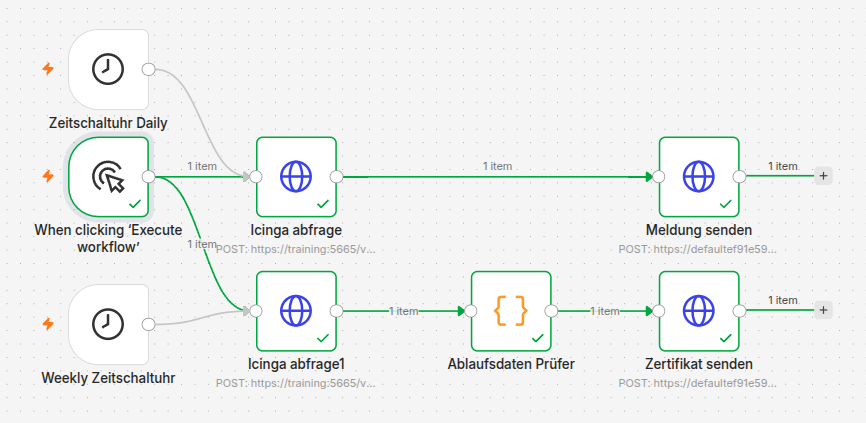
In just a few steps, you’ll have n8n installed on Ubuntu 26.04 and connected to Icinga. Alerts for hosts and services are sent to Microsoft Teams in real time, a status report and a certificate report run automatically, and new hosts and services are automatically included without any additional effort.
Before you start using the environment productively, there are two more things you should do: Set up HTTPS via a reverse proxy so that logins and webhooks are transmitted securely and you can remove the N8N_SECURE_COOKIE, and create a copy of the backups on a second system, including a one-time restore test.
Based on this, additional workflows can be added, such as automatically generated tickets for critical alerts, notifications sent to individual customers’ channels, or maintenance windows that customers can schedule via a form.
If you need help with this, feel free to contact us!
