



Last updated: October 15, 2026 · Reading time: 7–8 minutes
Installing Forgejo on Ubuntu 26.04 takes less than an hour, and once it’s done, you’ll have full control over your own Git server. This guide walks you through the preparation, database setup, signature verification, and web installer step by step, until Forgejo is running as a service and your first repository is ready.
The most important points in 30 seconds
- Installing Forgejo on Ubuntu 26.04 takes less than an hour, after which your own Git server will run as a systemd service.
- Forgejo runs under its own system user,
git, and uses its own MariaDB database. - For enterprise use, we recommend the LTS version, which includes approximately 15 months of support. You can verify the download’s signature using GPG.
- You can complete the basic configuration in the web installer on port 3000; afterward, access to the configuration will be restricted again.
- Before the system can be put into production, HTTPS via a reverse proxy and a backup plan are still needed.
In this guide, I’ll show you step by step how to install Forgejo on your Ubuntu 26.04, create a database, and complete the basic configuration using the web installer. Once that’s done, Forgejo will be accessible via IP on your network and ready for your team.
What is Forgejo?
Forgejo is a free, community-driven software forge with repositories, issues, pull requests, a wiki, and CI. It is lightweight, resource-efficient, and therefore ideal for self-hosting.
Installing Forgejo: Step by Step
Now it’s time to get started with the installation. You’ll work your way through nine steps, from system preparation to a secure configuration.
Step 1: Prepare the system
First, update your system and install Git, Git LFS, and the tools for downloading and verifying signatures:
sudo apt update && sudo apt upgrade -y
sudo apt install -y git git-lfs wget gpgWhy Git LFS? Large binary files, such as images, CAD drawings, or PDFs, end up in the Git history in their entirety with every version and bloat repositories. Git LFS stores them separately on the server and only includes a reference to them in the repository, so that only the required version is downloaded when cloning.
Step 2: Create a system user
Forgejo runs under its own git user , which is also used for SSH access to the repositories:
sudo adduser --system --shell /bin/bash --comment 'Git Version Control' \
--group --disabled-password --home /home/git gitA quick note on the options:
- –system creates a system user
- –group creates a group with the same name
- –disabled-password prevents password-based login (access will later be available only via SSH keys)
- –shell /bin/bash is required for Git to work over SSH
Step 3: Install and Secure MariaDB
Install MariaDB and then perform the basic security configuration:
sudo apt install -y mariadb-server
sudo mariadb-secure-installationSince root logs in via unix_socket on Ubuntu, you can click “No” when prompted for a root password. For all other questions , press Y to confirm .
Step 4: Create a Forgejo database
Forgejo requires its own database. Open the console with ` sudo mariadb ` and create a database and a user:
CREATE DATABASE forgejo CHARACTER SET utf8mb4 COLLATE utf8mb4_bin;
CREATE USER 'forgejo'@'localhost' IDENTIFIED BY 'DeinSuperSicheresPasswort';
GRANT ALL PRIVILEGES ON forgejo.* TO 'forgejo'@'localhost';
EXIT;Step 5: Download and verify Forgejo
Forgejo is released quarterly; once a year, an LTS version is released with approximately 15 months of support. For enterprise use, I recommend LTS: Instead of switching to a new major version every quarter, you only install minor security updates. As of the time of this post, the version is 15.0.7; you can find the latest version at forgejo.org/releases.
cd /tmp
VERSION=15.0.7
wget https://codeberg.org/forgejo/forgejo/releases/download/v${VERSION}/forgejo-${VERSION}-linux-amd64
wget https://codeberg.org/forgejo/forgejo/releases/download/v${VERSION}/forgejo-${VERSION}-linux-amd64.ascTo verify the signature:
gpg --keyserver keys.openpgp.org --recv EB114F5E6C0DC2BCDD183550A4B61A2DC5923710
gpg --verify forgejo-${VERSION}-linux-amd64.asc forgejo-${VERSION}-linux-amd64Step 6: Create a directory
sudo mkdir /var/lib/forgejo /etc/forgejo
sudo chown git:git /var/lib/forgejo && sudo chmod 750 /var/lib/forgejo
sudo chown root:git /etc/forgejo && sudo chmod 770 /etc/forgejoImportant: The configuration directory is temporarily writable because the Web Installer creates the app.ini file there. In Step 9, you revoke these permissions.
Step 7: Set up the systemd file
To have Forgejo start automatically and run in the background, create a service file. To do this, open the file with a text editor of your choice.
sudo vim /etc/systemd/system/forgejo.serviceSwitch to Insert mode and paste the following content:
[Unit]
Description=Forgejo (Beyond coding. We forge.)
After=network.target
Wants=mariadb.service
After=mariadb.service

[Service]
Type=simple
User=git
Group=git
WorkingDirectory=/var/lib/forgejo/
ExecStart=/usr/local/bin/forgejo web --config /etc/forgejo/app.ini
Restart=always
RestartSec=2s
Environment=USER=git HOME=/home/git FORGEJO_WORK_DIR=/var/lib/forgejo

[Install]
WantedBy=multi-user.targetThe entries `Wants= ` and `After=mariadb.service` ensure that Forgejo does not start until the database is ready. The file is a condensed version of the official template from the Forgejo project.
Next, reload the systemd configuration, enable the service, and start it:
sudo systemctl daemon-reload
sudo systemctl enable --now forgejoTo check if Forgejo is running, do the following:
sudo systemctl status forgejoSet up a Git server with support?
Whether it’s a reverse proxy, a backup, or integration with your CI/CD pipeline: Our consultants will help you seamlessly integrate Forgejo into your infrastructure.
Free initial consultation →
Step 8: Complete the Web Installer
Go to http://DEINE-IP:3000 in your browser. If the firewall is enabled, first open the port using sudo ufw allow 3000/tcp.
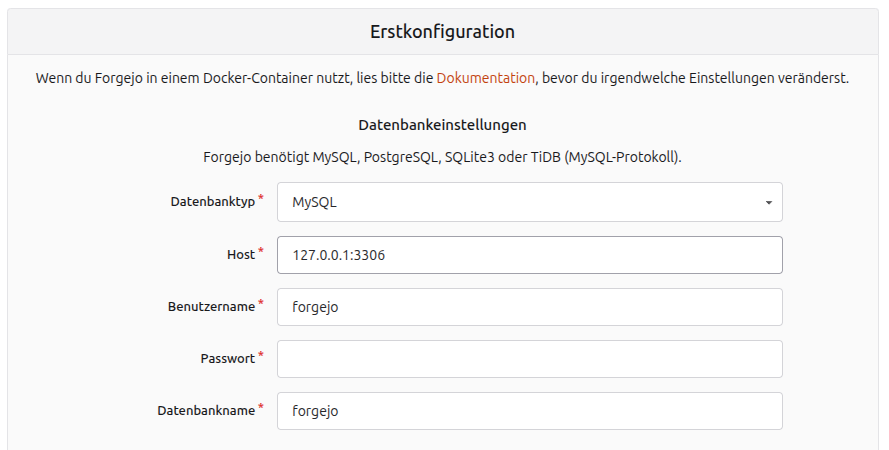
Database Settings
Under “Database Settings,” enter the login credentials from Step 4. Select MySQL as the database type; this also applies to MariaDB.
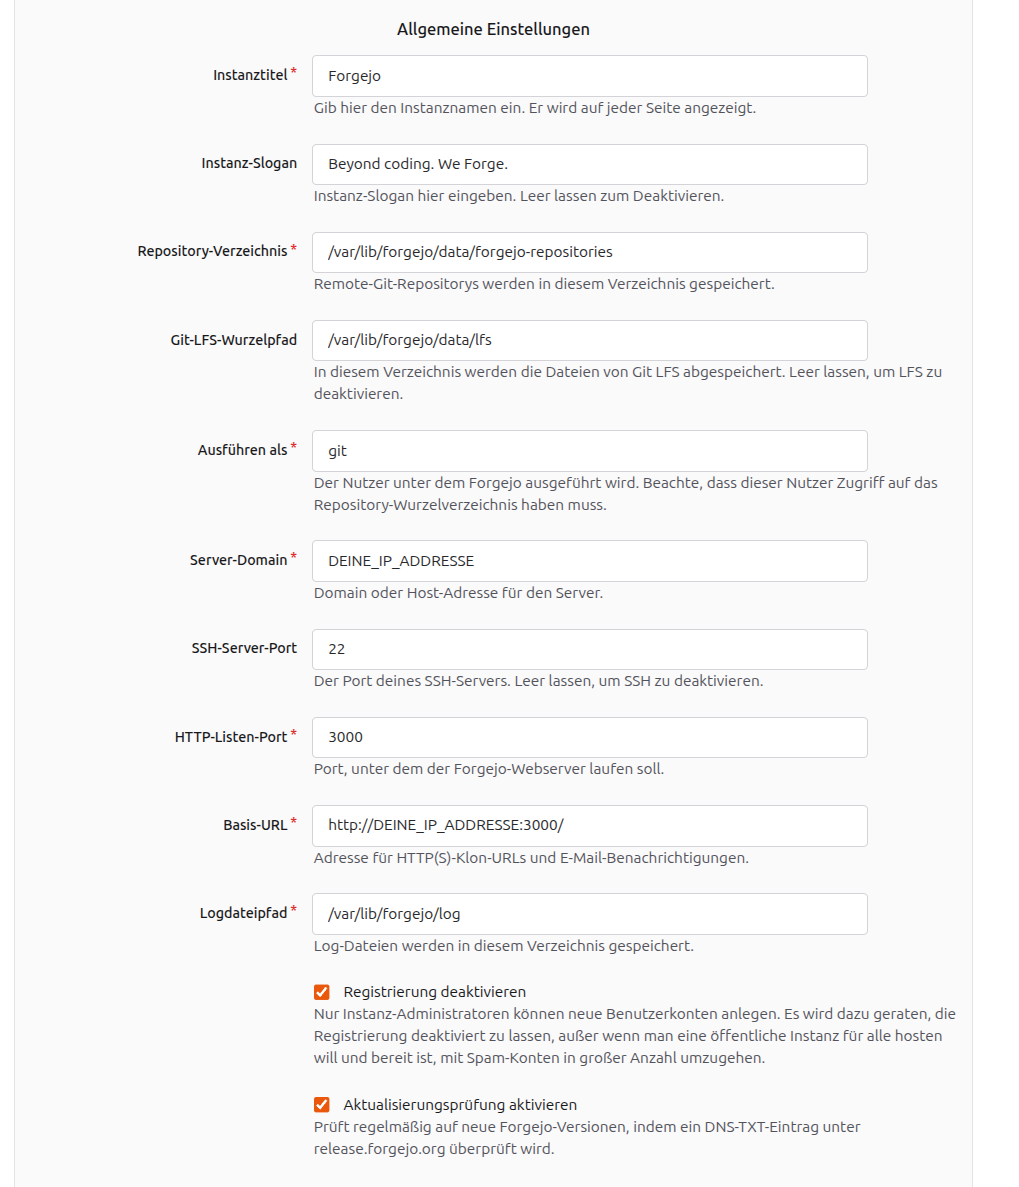
General Settings
Under “General Settings,” you can apply most of the default settings. All you need to do is adjust the server domain and base URL; enter your server’s IP address there. Git LFS is automatically enabled via the Git LFS root path. Leave the “Disable Registration” option enabled so that only administrators can create new accounts.
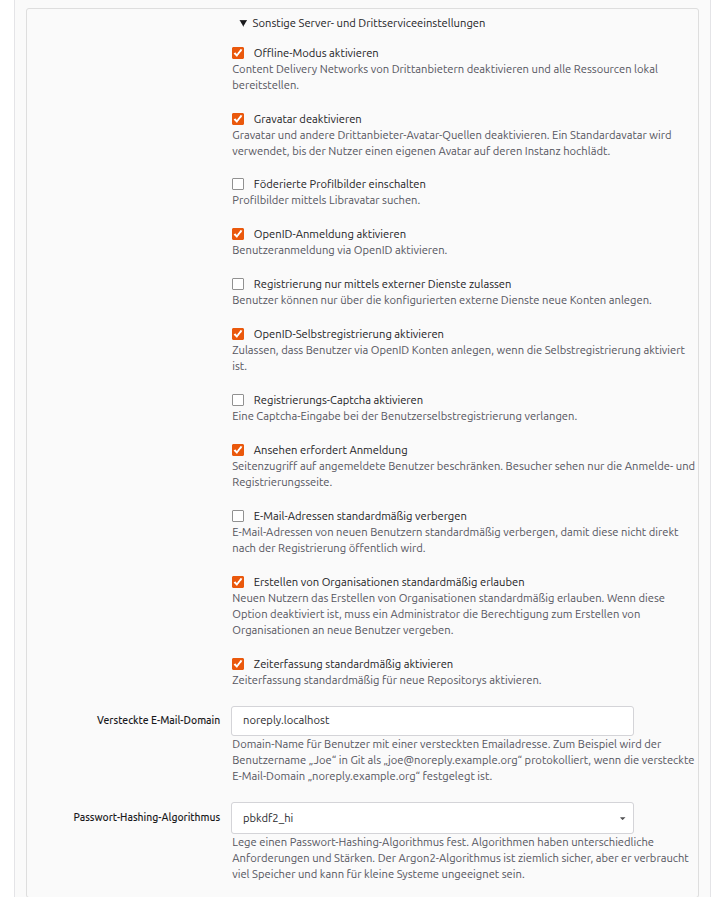
Other Server and Third-Party Service Settings
Next, expand the “Other Server and Third-Party Service Settings” section and select “Viewing requires login.” This way, visitors without an account will only see the login page. “Enable Offline Mode” and “Disable Gravatar” are already enabled and ensure that Forgejo does not contact any external services.
Create an administrator account
Under “Administrator Account Settings,” create your administrator account directly. In addition to a username and password, an email address is also required. The name “admin” is reserved, so please choose a different one.
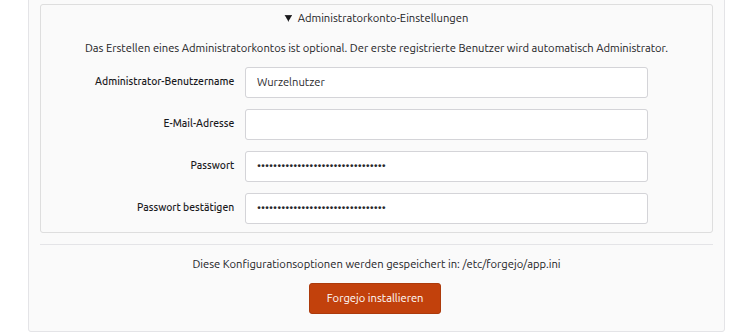
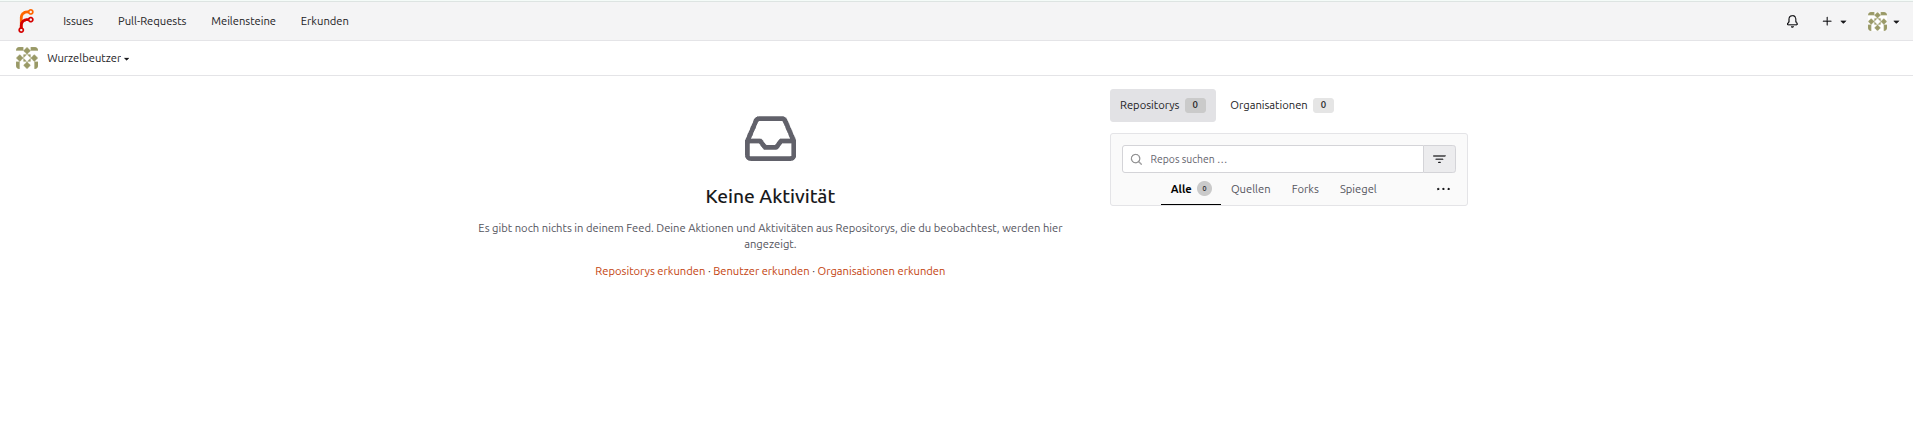
Finally, click ” Install Forgejo.” After a few seconds, you’ll be logged in and taken to the home page.
Step 9: Secure the configuration
Finally, Forgejo can only read his configuration:
sudo chmod 750 /etc/forgejo
sudo chmod 640 /etc/forgejo/app.ini
sudo systemctl restart forgejoForgejo is now fully set up and ready to use!
Conclusion on the Forgejo Installation
In just a few steps, you’ll have installed Forgejo on Ubuntu 26.04 and set up your own Git server that runs efficiently and is entirely under your control. Your instance is now ready for initial testing and deployment on the internal network.
However, before you start using it productively, there are two more things you should set up: HTTPS encryption via a reverse proxy to prevent unencrypted transmission of passwords and code, and a backup plan for the database and repositories.
If you need help with this, feel free to contact us. We’ll help you safely deploy Forgejo into production
